Moving your Tridion databases
As part of setting up my new laptop, I installed MSSQL and obviously I wanted to have my existing Tridion databases available. My Tridion image had previously not had a database - I had that running natively on the old laptop, but I'd decided to go with a more conventional approach and run it in the image with Tridion. This transition had a couple of interesting moments, and hence this post.
Moving the databases and getting MSSQL security working again.
The moving part was fairly simple. I just detached all the databases, and copied the pairs of .MDF and .LDF files over to the new location and attached them.
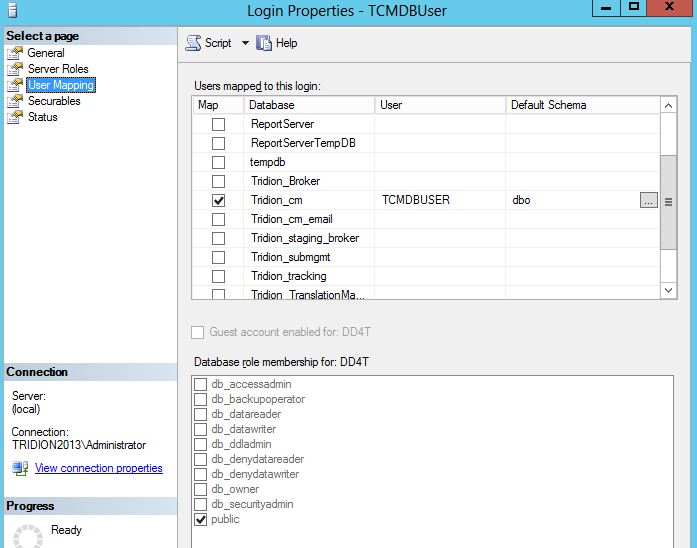
Once you've done this, you'll find that in each database, if you look under Security/Users, you'll find a User with a name that matches the login that you use in your Tridion configuration... for example: TcmDbUser. Unfortunately, this isn't enough. There are (at least) two kinds of User. The one you can see in your database (this is strictly a "database principal") can't be used for logging in. For that you need a "server principal", and these are to be found in your MSSQL instance under Security/Logins. For everything to work correctly, there needs to be a mapping between the database principal and the server principal. You can see this if you look in a correctly configured system. Right click on the login and open the properties, and open up the user mapping page. It should look something like this:

So what we're aiming for is to have a matching Login and database User, with the same name. Creating a Login is easy enough, but if you try to add the mapping by hand in the User Mapping page, it will fail, because it wants to create a database user, and a database user with the same name already exists. (You could delete it, but then you'd have a world of pain trying to figure out all the properties and settings that the Tridion database scripts take care of automatically. I'm not even sure if support would ever talk to you again if you did this.)
Fortunately, there's a better way. You can do it via SQL with various ALTER USER commands, but then you are going to be deeper into the security features of MSSQL than any normal person ought to wish for. (In this context, DBA's aren't normal, but then they won't be needing to read this blog post, will they?) However, you don't need to figure out all that SQL, because there's a system procedure (sp_change_users_login) that does exactly what you want. As long as your Login and User have the same name, you can just use the Auto_fix method, like this:

Remembering the database settings you'd forgotten about.
So I had all the MSSQL stuff correctly set up, or so I thought, but when I started to try to use the Tridion GUI, I kept getting error notifications in the Message centre.
A network-related or instance-specific error occurred while establishing a connection to SQL Server. The server was not found or was not accessible.
Verify that the instance name is correct and that SQL Server is configured to allow remote connections. (provider SQL: Network interfaces error, 26 - Error locating Server/Instance Specified)
This was pretty odd. I could see most of the GUI working fine, and publications were listed OK, but other lists weren't populated. I speculated that it might only be lists served via service calls that had problems, but when I checked the core service, it was able to list out my entire system. I spent quite some time fiddling with various settings and checking that named pipes etc., were configured correctly, before I eventually got smart enough to check T-REX again.In an old post from 2011, Rick Pannekoek suggested that a similar problem might be caused by the outbound email configuration.
Sure enough - I'd forgotten that outbound email has it's own database configuration (if I'd ever known it - the installer sets it all up and mostly you never need to look there, unless you're actually doing outbound email). Anyway - I certainly hadn't realised that this would break the Content Manager's GUI.
A quick visit to:
C:\Program Files (x86)\Tridion\config\OutboundEmail.xml
and then a bit of fiddling with decrypting and re-encrypting (there are scripts for this that come with the installer), and I had my system in fully working order.